Friday 27 August 2010

Ways With Egg Whites


This week I broke a record and managed to use 30 eggs in the space of four hours.

I made Tiramisu and a hell of a lot of custard for ice cream bases. During the last few weeks I have let the restaurant ice cream stock run rather low and now I find myself furiously whisking away at custard each night and dreaming of the flavours I will replace. So far, my efforts have seen an 'apple crumble' flavour and good old fashioned mint choc chip. The vanilla is begging to be made again so that'll be yet more eggs for me to separate. Of course, by the time I've made that, yet another flavour or two will have run out so I'll be making even more custard. I've some gooseberries in the freezer so I think I'll make 'Gooseberry and Elderflower' ice cream. If anyone has any suggestions for other ice cream flavours, I'd love to hear them.

Currently, I have 30 egg whites to use up. I will freeze a few in batches, but I'd like to use some while they're fresh. This is where you come in. I need some inspiration as to what to do with them. There's only so much buttercream I can make.

So leave me some suggestions as comments here or on my Facebook page and I'll see what I can do!

Thank you!

Ice Cream Petit Fours for the Daring Bakers


Late one night towards the end of July, I finally bit the bullet and joined the daring bakers. I've followed the monthly challenges with great anticipation for a while now, but it was not without a certain nervousness that I took a peek at what was to be my first challenge - to make browned butter pound cake and ice cream and assemble them into either a baked alaska or ice cream petit fours. Not being a huge meringue fan, I opted for the petit fours.

The August 2010 Daring Bakers’ challenge was hosted by Elissa of 17 and Baking. For the first time, The Daring Bakers partnered with Sugar High Fridays for a co-event and Elissa was the gracious hostess of both. Using the theme of beurre noisette, or browned butter, Elissa chose to challenge Daring Bakers to make a pound cake to be used in either a Baked Alasa or in Ice Cream Petit Fours. The sources for Elissa’s challenge were Gourmet magazine and David Lebovitz’s “The Perfect Scoop”.


I was a little nervous about browning butter for the first time. There is a fine line between achieving the nutty taste of browned butter and the charcol taste of burned butter. Five minutes or careful stirring paid off however, and all of a sudden, the kitchen was filled with the delicious aroma of toasted nuts.

As you can see, I decided to customise mine and serve them at M's first birthday party. My first DB effort paid off and they were a huge hit. Even with the birthday girl herself, who was treated to a bite or two and then spent a happy ten minutes with a chocoloate moustache.

Anyone who knows me, knows that I really enjoy making ice cream. One day, I will have a little gelateria where I will churn my flavoured custards all day long and L can serve his beloved espressi and capuccini.

I envisage M being 'That girl whose parents have the ice cream shop' and all of her early birthday parties will involve gatherings there and her friends putting as many flavours and toppings into their sundae dishes as is physically possible. Just imagine the mess!
Seeing as I love making ice cream so much, churning a batch of vanilla was not going to be a problem.

Vanilla Ice Cream


Ingredients
1 cup (250ml) whole milk
A pinch of salt
3/4 cup (165g) sugar
1 vanilla bean, split lengthwise OR 2 teaspoons (10ml) pure vanilla extract
2 cups (500ml) heavy (approx 35% butterfat) cream
5 large egg yolks
1 teaspoon (5ml) pure vanilla extract


Method
Heat the milk, salt, and sugar in a medium saucepan until the liquid steams. Scrape out the seeds of the vanilla bean with a paring knife and add to the milk, along with the bean pod. Cover, remove from heat, and let infuse for an hour. (If you do not have a vanilla bean, simply heat the milk, salt, and sugar in a medium saucepan until the liquid steams, then let cool to room temperature.)
Set up an ice bath by placing a 2-quart (2 litre) bowl inside a large bowl partially filled with water and ice. Put a strainer on top of the smaller bowl and pour in the cream.
In another bowl, lightly beat the egg yolks together. Reheat the milk in the medium saucepan until warmed, and then gradually pour ¼ cup warmed milk into the yolks, constantly whisking to keep the eggs from scrambling. Once the yolks are warmed, scrape the yolk and milk mixture back into the saucepan of warmed milk and cook over low heat. Stir constantly and scrape the bottom with a spatula until the mixture thickens into a custard which thinly coats the back of the spatula.
Strain the custard into the heavy cream and stir the mixture until cooled. Add the vanilla extract (1 teaspoon [5ml] if you are using a vanilla bean; 3 teaspoons [15ml] if you are not using a vanilla bean) and refrigerate until thoroughly chilled, preferably overnight.
Remove the vanilla bean and freeze in an ice cream maker. If you don’t have an ice cream maker, you can make it without a machine.

Brown Butter Pound Cake


Ingredients
19 tablespoons (9.5 oz) (275g) unsalted (sweet) butter
2 cups (200g) sifted cake flour (not self-rising; sift before measuring) (See “Note” section for cake flour substitution)
1 teaspoon (5g) baking powder
1/2 teaspoon (3g) salt
1/2 cup (110g) packed light brown sugar
1/3 (75g) cup granulated sugar
4 large eggs
1/2 teaspoon pure vanilla extract

Method
Preheat the oven to 325°F/160°C and put a rack in the center. Butter and flour a 9”x9” (23cmx23cm) square pan.
Place the butter in a 10” (25cm) skillet over medium heat. Brown the butter until the milk solids are a dark chocolate brown and the butter smells nutty. (Don’t take your eyes off the butter in case it burns.) Pour into a shallow bowl and chill in the freezer until just congealed, 15-30 minutes.
Whisk together cake flour, baking powder, and salt.
Beat the brown butter, light brown sugar, and granulated sugar in an electric mixer until light and fluffy, about 2 minutes. Beat in the eggs one at a time, mixing well, and then the vanilla extract.
Stir in the flour mixture at low speed until just combined.
Scrape the batter into the greased and floured 9”x9” (23cmx23cm) square pan. Smooth the top with a rubber spatula and rap the pan on the counter. Bake until golden brown on top and when a toothpick inserted into the center comes out clean, about 25 minutes.
Cool in the pan 10 minutes. Run a knife along the edge and invert right-side-up onto a cooling rack to cool completely.

Chocolate Glaze (For the Ice Cream Petit Fours)

Ingredients
9 ounces (250g) dark chocolate, finely chopped
1 cup (250 ml) heavy (approx 35% butterfat) cream
1 1/2 tablespoons (32g) light corn syrup, Golden syrup, or agave nectar
2 teaspoons (10ml) vanilla extract
Method
Stir the heavy cream and light corn syrup in a small saucepan over medium heat until it comes to a boil. Remove from heat and add the dark chocolate. Let sit 30 seconds, then stir to completely melt the chocolate. Stir in the vanilla and let cool until tepid before glazing the petit fours.


Assembly Instructions – Ice Cream Petit Fours


Line a 9”x9” (23cmx23cm) pan with plastic wrap, so that no sides of the pan are exposed and so there is some extra plastic wrap hanging off the sides. Spread 1 ¾ to 2 cups (450ml to 500ml) ice cream into the pan. Cover with more plastic wrap and freeze several hours.
Once the brown butter pound cake has completely cooled, level the top with a cake leveler or a serrated knife. Then split the cake in half horizontally to form two thin layers.
Unwrap the frozen ice cream. Flip out onto one of the layers of cake and top with the second layer of cake. Wrap well in plastic wrap and return to the freezer overnight.
Make the chocolate glaze (see above.)
While the glaze cools, trim ¾” (2cm) off each side of the ice cream cake to leave a perfectly square 7.5” (19cm) ice cream cake. Cut the cake into twenty five petit fours, each 1.5”x1.5” (4cmx4cm).
Glaze the petit fours one at a time: place a petit four on a fork and spoon chocolate glaze over it.
Place the petit fours on a parchment-lined baking sheet and return to the freezer for one hour.


Some leftover ice cream and cake trimmings weren't to be wasted and I attempted some frozen cakepops with some coconut chocolate magicshell from the pomegrante lollies I made back in June.
If you've never heard of cakepops, google them now. Never has anything been so easy as crumbling some cake and beating in some frosting  before rolling the mixture into little balls ready to be dipped in a chocolate or candy casing.

Tuesday 24 August 2010

Red Velvet Cake for a Redhead


L and I love to host parties, at home or at the restaurant. When A asked us to host her 18th birthday party at the restaurant we were delighted. As has been a birthday tradition for L for several years now, A asked for a quiz night for her and up to 40 friends.

Putting together a 50 question quiz is quite a challenge, but it's also quite fun and some of the things I've learnt as a result will certainly help me in any quizzes I might find myself at over the next few years. I can't let you in on any of this secret knowledge though - what if I put them this years quiz?

Thinking of that, I'll have to start thinking about the next quiz quite soon.

A quiz seems to give a team quite an appetite too. I have a standby curry recipe suitable for mass catering and we always make a vegetarian option to go with chips, chips and more chips.

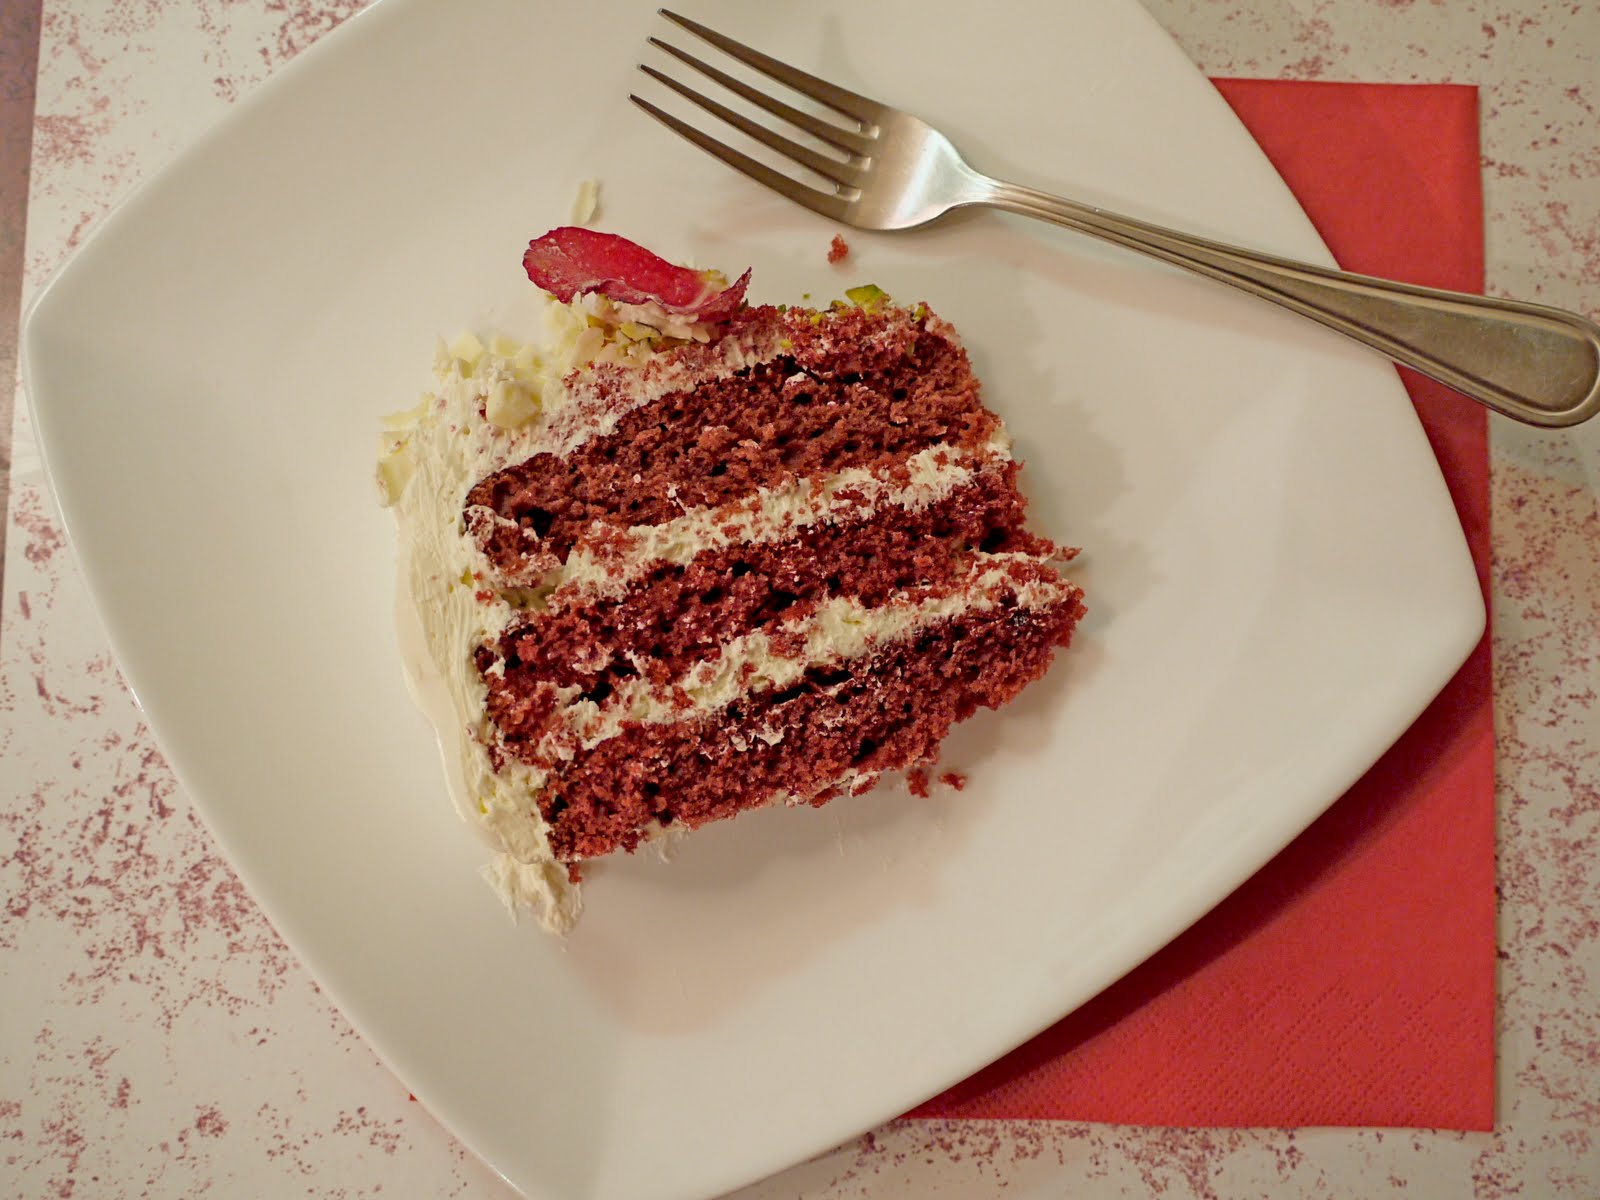
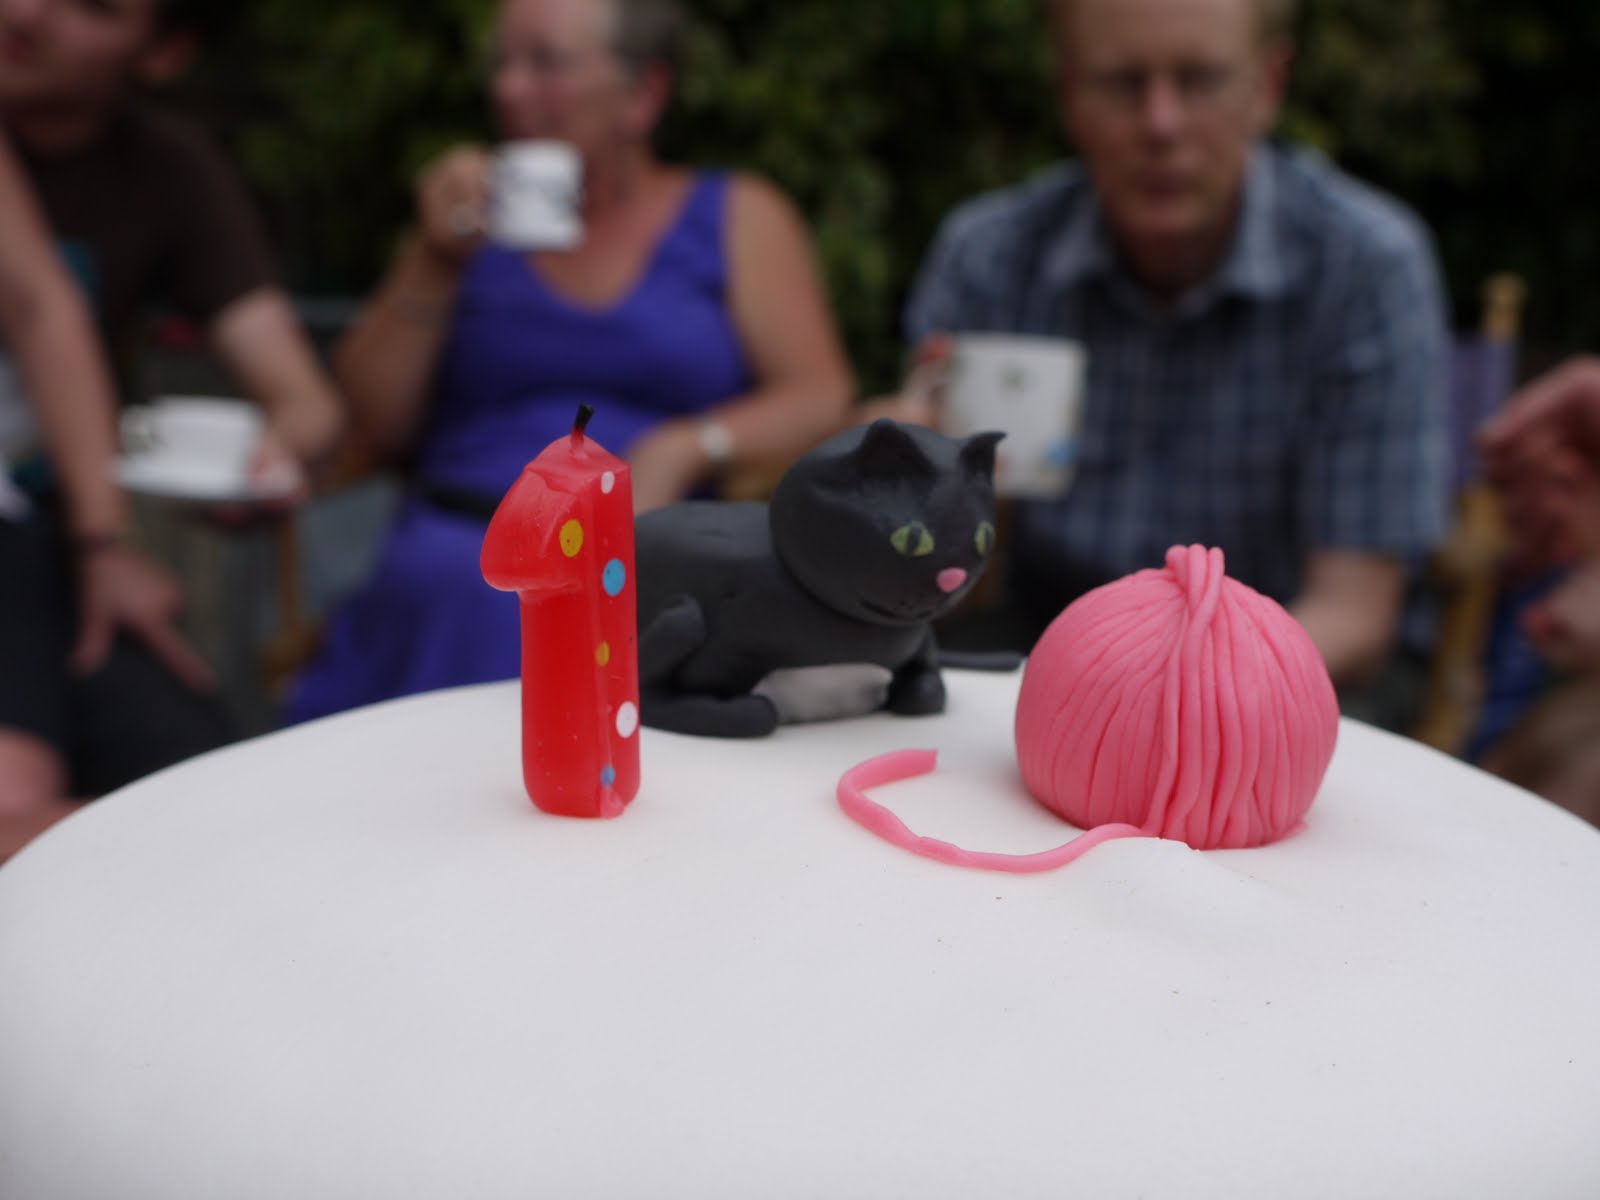
Naturally, a birthday party requires cake like tonic water needs a shot of gin. This cake was going to be special one, standing tall and clean with 18 candles ablaze on top. A has dyed her hair almost every shade of red under the sun lately and I thought it would be fun to make the cake sponge red and luckily, it turned out almost exactly the same shade as her current colour. I wonder if she noticed?!


Red Velvet Cake with White Chocolate Swiss Meringue Buttercream, Pistachios and Crystalised Rose Petals (adapted from the Hummingbird bakery cookbook. Makes a 3 tiered cake)

Ingredients
For the cake
180g unsalted butter, at room temperature
450g caster sugar
3 eggs
30g cocoa powder
60ml liquid red food colouring
1½ tsp vanilla extract
360ml buttermilk
450g plain flour
1 tsp salt
1½ tsp bicarbonate of soda
4 tsp white wine vinegar
For the buttercream
9 egg whites
1 ¾ c (350 g) sugar
4 sticks (532 g) of butter, room temp
150g white chocolate, melted and cooled
To decorate
50g unsalted pistachio nuts
75g white chocolate
1 organically grown rose
1 egg white
caster sugar for dusting

Method
For the cake
Preheat the oven to 170°C.
Beat butter and the sugar on medium speed until light and fluffy and well mixed.
Turn the mixer up to high speed, slowly add the egg and beat until everything is well incorporated.
In a separate bowl, mix together the cocoa powder, red food colouring and vanilla extra ct to make a very thick, dark paste. Add to the butter mixture and mix thoroughly until evenly combined and coloured (scrape any unmixed ingredients from the side of the bowl with a rubber spatula).
Turn the mixer up to slow speed, slowly pour in half the buttermilk.
Beat until well mixed, then add half the flour and beat until everything is well incorporated. Repeat this process until all the buttermilk and flour have been added. Scrape down the side of the bowl again.
Turn the mixer up to high speed and beat until you have a smooth, even mixture.
Turn the mixer down to low speed and add the bicarbonate of soda and vinegar. Beat until well mixed, then turn up the speed again and beat for a couple more minutes.
Pour into a deep springform greased and lined 6" cake tin.
Bake for about 40 mins or until done. Check for doneness by inserting a toothpick in t he middle, should come out clean if done.
Leave to cool slightly in the tin before turning out onto a wire cooling rack to cool completely.
Using a large serated knife, carefully split the cake into 3 horizontal layers.
Make the crystalised rose petals at this point so that they have time to dry out (see below for method).

For the buttercream
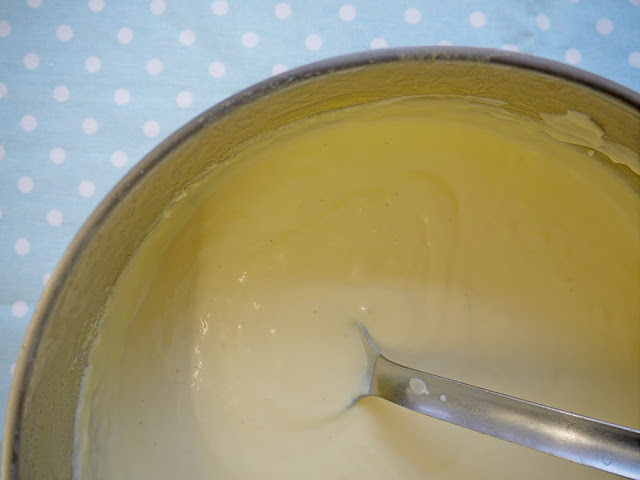
Cook the egg whites and sugar in a small saucepan over medium heat,stirring constantly, until the sugar is completely dissolved (rub some between your fingers to check if it is completely smooth and all the sugar is incorporated).
Pour into another bowl (a stand mixer is preferable) and whip on high speed until you have stiff peaks and the mixture is glossy.
Chop up the butter into about 15 squares and then on a medium-slow speed, add the butter, waiting until each piece is completely incorporated before adding the next. After all the butter has been added, turn the mixer back to high speed and whip until it has come together, about five minutes.
Then add the cooled white chocolate and beat for two minutes more until smooth.


To decorate
On a plate or covered cake board, place a dessert spoon of the buttercream and spread into a circle no bigger than the cake and place the bottom layer of cake on top to stick it in place.
Using a palette knife, spread some of the butter cream across the top of this layer of cake and then place the next cake layer on top. Spread yet more of the buttercream on top of this and place the final cake layer on top. Finally, spread more buttercream on top and a little down the sides to crumb coat. Only use a small amount of the buttercream for this to stop the crumbs coming through the icing.
Next, reserve a tablespoon of the butter cream and spread the rest of the buttercream over the top and sides. Dip the palette knife in warm water and then wipe the drips off, before using the warmed knife to smooth the sides and top down.
Using a mezzaluna, roughly chop the pistachio nuts and carefully arrange them into a circle shape in the middle of the cake.
Using the bluntest kitchen knife you have, drag it slowly down the side of the chocolate bar, to create rough curls. Fill a bowl with iced water to dip your hands into when the chocolate feels as though it's melting in your hands.
Cover the rest of the top of the cake with the white chocolate curls.
Put the reserved buttercream in a piping bag and pipe it around the centre of the cake between the pistachio and chocolate curls.
To make the crystalised rose petals, lightly beat the egg white until it foams and use a pastry brush to gently cover each side of the petals. Sprinkle both sides with caster sugar and place on some greaseproof paper to dry out for eight hours.
When dry, arrange overlapped on top of the piped buttercream and press down lightly to secure in place.

Friday 20 August 2010

How Will You Eat Yours?


Well iced cupcakes are a little like Cadbury's Creme Eggs - everyone eats them differently.

Personally, I prefer one of my new and very cute little cake forks so I don't get my fingers sticky. M naturally just dives in to what ever you give her and then proceeds to either offer some back to you, or if you're really lucky, rubs it as hard as she possibly can into the carpet. L ate his in only  few mouthfuls while A picked a crumb off at a time, apparently savouring hers. Someone else in the room, who will remain nameless, quietly licked all of the buttercream off the top before starting on the cake itself.

Sometimes, all it takes is seeing a new or limited edition item in a shop to inspire a tasty treat. Realising I needed some more teabags, I turned into the appropriate aisle in the supermarket and looked for something interesting and on offer. Tight, aren't I? Nestled in amongst the Twinings boxes were two new varieties. 'Rose Garden', which I have yet to try and am slightly nervous to - the scent of the box evoked the image of a little old lady; and 'Blossom Earl Grey', which is delicious with an orange blossom flavour to compliment the bergamot flavour of Earl Grey.

I have been deliberating whether or not to prepare a few cupcakes for sister A, to have on her 18th birthday when we visit for a cup of tea and some gift giving - later in the week I will be making a cake for her to have at her party. With the box of teabags in hand and a realisation that I had some strawberries to use up, I decided to make Earl Grey cupcakes with Strawberry Swiss meringue butter icing.
Lemon icing would work equally well here, seeing as a slice of lemon is the traditional accompaniment to a cup of Earl Grey. I however, wanted to give everyone a sort of English cream tea in cupcake form.

Earl Grey Cupcakes with Strawberry Swiss Meringue Buttercream (makes 12)


Ingredients
110g unsalted butter
200g caster sugar
2 large eggs
225g plain flour
2tsp baking powder
pinch of salt
3 Earl Grey teabags
120ml milk

Method
Heat the milk in a small pan and place one of the teabags in to infuse. Leave to cool.
Preheat the oven to gas mark 4 and line a cupcake tray with 12 cupcake paper cases.
Cream the butter and sugar together until light and fluffy.
Add the eggs, one at a time, with a tablespoon of the flour and beat until well incorporated.
Add the rest of the flour, along with the baking powder and salt. Split open the last two teabags and add the crushed tea leaves to the bowl. Mix well.
Finally, remove and squeeze the tea bag out of the milk and beat into the cake batter.
Use a dessert spoon to divide the mixture amongst the paper cases and place into the oven for 20mins until golden brown and springy to the touch.
Leave to cool on a cooling rack before decorating.

Strawberry Swiss Meringue Buttercream
1 large egg white
80g unsalted butter, at room temperature
pinch salt
60g strawberries, pureed and sieved with...
1 dessert spoon Monin strawberry syrup (optional)

Place the egg white and sugar into a glass bowl over a pan of barely simmering water, and stir until the sugar has dissolved. To test, put two fingers into the egg and rub together to check there are no sugar grains left.
Transfer the egg whites to be whisked for about 10mins in a freestanding mixer until they are glossy and have stiff peaks.
Cut the butter into squares and add it a piece at a time with the pinch of salt, whisking all the while until each is incorporated into the icing and it is smooth.
Switch to the paddle attachment and add the pureed strawberries and Monin syrup, if using. Beat for a further 4mins until smooth.
Carefully transfer to a piping bag with the desired nozzle and decorate your cakes as you wish.

Monday 16 August 2010

A Very Special First Birthday Party


It was two weeks late, but yesterday we finally hosted M's 1st birthday party. Nearly 30 people tottered down to our little terraced house and we enjoyed a few hours of the afternoon sun that we'd been praying for, for the last wet and miserable week.

L and I put on a large spread including poached wild salmon, courgette, tomato and rice tart, and my famous sausage plait - recipe to follow - as well as the traditional cheeses, salad, dips and crisps. We also put together a little brown paper, raffia-tied party bag for each of our guests, young and old, with traditional toys. I especially loved the little wooden pull back mice that I got for the other babies who celebrated with us.
M was thoroughly spoilt by everyone with some truley beautiful gifts.
I do wish one of my close friends would have a baby - I love going baby gift shopping!


Needless to say, I was pretty busy cooking towards the end of the week and the highlight was, as always is for me, the cake.
M has a few words now, but our favourite is 'aat'. Which is her way of saying cat, but she uses it to refer to all other animals. I have found myself replying 'Yes, M, that's a cat', when in fact it is a very large, hairy dog.
I am so pleased my baby is a going to be a cat person, she already enjoys poking our cat, Connie, at every available opportunity.

I had big plans for her first birthday cake, but midweek I decided I would give myself a treat by chopping the top of my finger off with my largest, sharpest knife, rendering me useless for fancy baking projects. My plans scuppered, I decided on a plain maderia cake, iced with white fondant and simply decorated with a cat and ball of wool. Both M and you will have to wait until next year for to see what I had planned.


This week my baby sister celebrates her eighteenth. Wowee. I have so many embarassing stories to tell her friends at her party next weekend.
I promise, there will be a cake recipe this week without fail - I have something rather fun up my sleeve.

For now, happy Monday, and enjoy the beautiful weather!

Wednesday 11 August 2010

Farmer's Market Courgettes and a Trip to Witley Court


I suppose I am not the only person who thinks this, but where has the year gone? Seriously.
I can't believe that it is August and that we are well over half way into the year and that the nights are slowly beginning to creep in again. Sorry to start with such a depressing tone, but looking out onto the restaurant courtyard, I notice the earlier darkness each evening.

I am making a point of enjoying the summer days while they last.

On Saturday, the Farmer's market came to Hightown. I know it comes twice a month, but I don't keep track of the dates so that when I find it again it is a wonderful surprise. We have a variety of stalls but I just can't keep away from the fruit and vegetable stalls. This weekend I picked up five varieties of courgette for £1. I practically had to be restrained from buying anymore. Courgettes are my favourite vegetable. I am more than happy to use them in every conceivable way and devour the results in moments. I hope this love rubs off on M, but she seems to have a spinach fetish instead, so I suppose I shouldn't be too picky.

This weekend we enjoyed a day out to yet another ruin. This time however, rather than being a ruined castle, we went to a ruined stately home. Witley Court near Worcester is a very grand Georgian house that burned down in 1937 after a kitchen fire. Now all that stands is the empty shell and recently restored gardens.


L helped me to pack up a picnic on Sunday morning and we sat on the grass and ate it with R, H and of course M, who tried to dip as many crudites as she could into as many dips as possible whilst running off towards the restored fountain and the few dogs that came into sight. It's so exciting to see her running around already.

Multicoloured Courgette, Tomato and Rice Tart


Ingredients
For the pastry
300g plain flour
100g softened butter
50g Trex or other vegetable fat
Cold water to bind
For the filling
200g precooked Arborio rice
2 tomatoes
Half a yellow ball courgette
Half a long green courgette, I used Striato di Napoli
Fresh thyme
Olive oil

Method
Prepare the pastry by sieving the flour into a bowl with some salt and pepper. Dice the butter into the flour and use your fingertips to rub the ingredients together until they look like breadcrumbs.
Add a tablespoon of water and bring the dough together with your hands. Use more water if necessary.
Wrap in cling film and place in the fridge to rest for 30mins.
Grease a 23cm loose bottomed flan tin.
On a floured surface, roll out the dough to 5mm thick and transfer carefully to the flan tin using the rolling pin. Carefully push it down into the corners and trim to fit. Place in the fridge for a further 10mins to help it not shrink during cooking.
Preheat the oven to gas mark 5.
Line the pastry with greaseproof paper and pour baking beans into it.
Cook for 15 - 20mins until just golden.
Remove from the oven and leave to cool for a few minutes before returning the baking beans to their tub to cool. Remove the greaseproof paper.
Spread the rice over the pastry case then drizzle a little olive oil over.
Thinly slice the tomatoes and courgettes and arrange as you wish over the top before scattering some thyme leaves and seasoning over this. Drizzle with a little more oil, season and return to the oven for 30mins until the vegetables are just golden and beginning to turn up at the edges.

Friday 6 August 2010

Ripe Fruit from Italy


This week L's parents came back from their summer holiday to their appartment in Florence and a seaside town, cecina that they have visited with their children and now, their eldest grandchild.
Tales of long, hot summer days spent frolicking on the beach are often recalled with great excitement. I've not had a beach holiday for years, and certainly never had one in as hot a place as the Tuscan coast so I look forward to taking M one day when she is old enough not to sit and eat the salty sand all day long.

When they return from Italy, B and D are always particularly generous with gifts for the children and wedges of aged, grainy parmesan and when in season, fruits from their garden or the amazing markets just around the corner. On this occassion they replenished our fruit bowl with delicious figs, peaches and apricots.
During their flight home, the peaches and apricots had got a bit battered - it seems they were just too ripe to hold their shape in transit.
Rather than waste them, a recipe where their bruises weren't obvious was needed. I am a huge fan of warm crumble, taken out of the oven an hour before a meal is due to start so that it is just warm when you finally spoon some cream or yoghurt, my prefered accompaniment to crumble, over the top.

Ingredients
For the filling
4 ripe apricots
3 ripe peaches
2tsp orange flower water
50g caster sugar
100ml water
For the crumble
200g plain flour
125g caster sugar
150g soft unsalted butter

Method
Slice the peaches and apricots into a heavy bottomed saucepan along with the orange flower water, caster sugar and water.
Stew over a medium heat, stirring often, until the fruit is just pulpy and has produced a syrupy orange sauce.
Place the flour and sugar into a large bowl and mix well.
Cube the softened butter into the flour and rub in using your fingertips until the mixture resembles breadcrumbs.
Spoon the fruit mixture into an ovenproof dish, then sprinkle the crumble mixture onto the top.
Bake in the oven at gas mark 4/180C for 30 - 40 mins until the crumble is golden and the fruit just bubbling up at the surface.
Serve with cream or yoghurt and a big dollop of nostalgia.

Flammkuchen for Some Weary Travellers


This Monday night we welcomed back R - M's Godfather who often stays with us while he is working. He is quite definitely a man with an appetite, so something rich in carbohydrates for supper was definitely on the cards.

I had spent the day alone at home with M, as L had gone South for a flying visit to his grandmother. When he has been travelling all day, he likes to come home to a treat of a takeaway in front of the tv - most often pizza. Sometimes we go for that blasphemous option, especially if I'm too tired to cook, but that day I decided it would be easy enough to knock up some bread dough (I have spent months trying to perfect my pizza dough recipe, and think at last I have it). I did not have time however to knock up some tomato sauce to top it with and nor could I be bothered to go and pick up mozzarella and other toppings. I've had some creme fraiche in the fridge for a week that was begging to be used and upon remembered an article in the newspaper I'd read a couple of weeks ago about alternatives to pizza, decided that a Flammkuchen or Tarte Flambee was what we'd be dining on that evening.

Flammkuchen is similar to pizza, but the top is traditionally spread with well seasoned creme fraiche, scattered with lots of red onions and bacon and sprinkled with fresh chives when it comes out of the oven. I was feeding two vegetarians so bacon was naturally out of the question. I put some leftover cooked spinach from lunch on one of them, which also worked a treat.

We got two Flammkuchen out of this recipe

Ingredients
For the dough
200g strong white bread flour
100g wholegrain spelt flour
1/2 tsp salt
1tsp caster sugar
14g dried yeast
175ml warm water
1tbsp olive oil
For the topping
200ml creme fraiche
50ml double cream
salt, pepper and nutmeg to taste
2 red onions, halved and finely sliced
generous handful of chopped fresh chives
(50g bacon or pancetta)

Method
To make the dough, mix the flours and salt in a large bowl and make a well in the middle using the back of a spoon.
Dissolve the yeast in the water with the caster sugar and leave for three minutes to foam a little.
Pour this into the well along with the olive oil and combine until a dough has formed. Knead for 5 mins until the dough is silky and elastic.
Cover with a tea towel and leave to rise for 30mins in a warm place.
Knock down the dough and divide into two balls before leaving to rise for another 30mins.
Preheat the oven to as high a temperature as it will go - gas mark 9 in our case.
On a well floured surface, roll out each dough ball to fit onto two lightly greased baking sheets and transfer them over using the rolling pin to help.
In a bowl, mix together the creme fraiche and double cream with some salt, freshly ground black pepper and freshly grated nutmeg. Spread this over the bases.
Scatter the red onion slices and pancetta, if using, all over the creme fraiche.
Carefully place into the oven and cook for about 10mins until it is golden brown and bubbling.
Scatter the fresh chives over the top and serve.