Wednesday 29 September 2010

A Little Something to Quench my Thirst for Coffee


I like coffee.

A lot.

I think my parents first let me try coffee around age 3, and although it was years later before I started drinking it regularly, they certainly woke my tastebuds up to the bitter-sweet drink.

On Doctors orders, during my pregnancy, I barely drank any of it (what a good girl) and what I did have was decaffinated. For eight months of breastfeeding, I kept avoiding it, again only having the occassional decaf and now I find myself in a bit of a predicament.
I can't drink the real stuff anymore. It gives me the jitters. Boooooo. This is seriously upsetting news.

The lights on the coffee machine at the restaurant blink at me and every now and then I hear Leo frothing milk for a customer. Although I can have a cappuccino made with some instant coffee granules, I miss knowing that the sound of the coffee being freshly ground, levers being twisted, and water almost dripping through the machine is for a cup of coffee for me to enjoy.

As a result, I have determined to get my fix in other ways. Leftover tiramisu often hits the spot with its soft biscuits and sweet, creamy mascarpone. One of my favourite cakes is a good old fashioned coffee and walnut sponge, made heavy by a brown sugar icing (but oh, how it makes my sensitive little teeth hurt!) and studded with walnut halves.

Considering what a strong and distinctive taste coffee has, it i surprises me how many flavours it pairs well with.  A few days ago, we found ourselves having these coffee meringues stuffed with raspberries and whiskey flavoured cream. No pictures though sorry, we ate them rather too quickly!


Ingredients
250g caster sugar
3 tsps ground up instant coffee granules
1/4 tsp cream of tartar
4 large egg whites

Method
Preheat the oven to gas mark 1 and line two baking trays with baking paper.
In a medium bowl, mixt together the sugar, coffee and cream of tartar until well combined.
Whisk the egg whites in a clean grease free bowl (you can run a cut lemon around the inside to be sure it is greasefree) until they are foamy. One tablespoon at a time, add the dry ingredients until the meringue is thick, glossy and ivory in colour.
Pipe or spoon the meringue in 4cm diameter rounds on to the lined baking sheets, giving about 3cm between meringues.
Put in the oven for about 45 minutes until they have dried out. After this time, turn the oven off and leave them inside for another hour with the door slightly ajar to cool.
Use a palette knife to lift them off the baking paper.
These will last a week in an airtight container.


Monday 27 September 2010

A Very Good Excuse for Buying Some New Cookie Cutter Shapes


I feel like I'm back in nursery again - watching the teacher mix up the powder paint in little plastic pots with whichever spoons are available. This time, I'm the teacher. Sadly I have no pupils; just a toddler wondering what mummy is doing and a husband wondering why, after hours and hours of icing and waiting for the various layers to dry, I still haven't finished. And, more importantly, why he isn't allowed to eat one yet.

Sugar cookies are a lot of fun to make. Sure, they seem like a lot of work, but once you are in the swing of things and you know how you might like to ice them, they become a most satisfying challenge. I had so many ideas for a theme for these. We were asked by Mandy to decorate them according to something that was happening to us this month. Where was I to begin?

We celebrate our wedding anniversary towards the end of the month - a love theme perhaps? No, not this time.
How about another little homage to E, off on her big adventure in France. I debated some iced farmyard animals all dressed up in their various colours and little cookies underneath giving the names of  'les animaux francais'. Too time consuming.
Well what about a calendar for the month? We had plenty of appointments and I could ice some little squares - some with the dates on when we weren't doing anything, and others with little drawings of our daily doings: a tooth for the dentist, a little car for long distance trips and a little candled cupcake for family birthdays. Who was I kidding? Not only did I not have the time, I didn't have enough piping bags and I wasn't going to go and fill the kitchen draw with them!

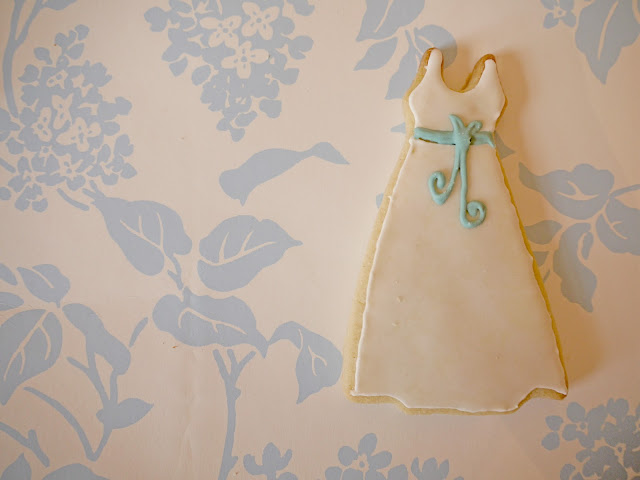
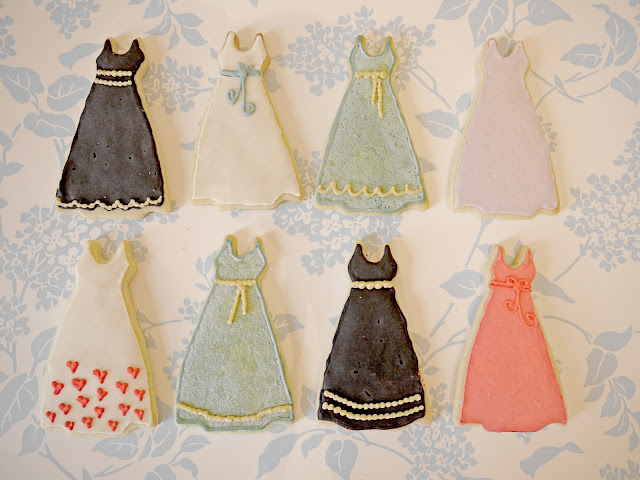
In the end I settled on something for A, who has been doing some work experience this month backstage at a theatre. She would like to be a seamstress when she's old enough and has been enjoying the costume changes and sewing people into their costumes. I imagine it as an upmarket version of 'the Hills'. Sorry Lauren.
I spent a happy hour online at a cookie cutter website and ordered a few. Just a few, I swear. A dress and a mask caught my eye and almost before the postman could hand their parcel over at the door, I was in the kitchen, making some dough and pressing my new toys into it.


The September 2010 Daring Bakers’ challenge was hosted by Mandy of “What the Fruitcake?!” Mandy challenged everyone to make Decorated Sugar Cookies based on recipes from Peggy Porschen and The Joy of Baking.


Basic Sugar Cookies:
Makes Approximately 36x 10cm / 4" Cookies
200g / 7oz / ½ cup + 6 Tbsp Unsalted Butter, at room temperature
400g / 14oz / 3 cups + 3 Tbsp All Purpose / Plain Flour
200g / 7oz / 1 cup Caster Sugar / Superfine Sugar
1 Large Egg, lightly beaten
5ml / 1 tsp Vanilla Extract / Or seeds from 1 vanilla bean
Directions
• Cream together the butter, sugar and any flavourings you’re using. Beat until just becoming
creamy in texture.
• Beat in the egg until well combined, make sure to scrape down the sides of the bowl.
Add the sifted flour and mix on low until a non sticky dough forms.
• Knead into a ball and divide into 2 or 3 pieces.
• Roll out each portion between parchment paper to a thickness of about 5mm/1/5 inch (0.2 inch)
• Refrigerate for a minimum of 30mins.
• Once chilled, peel off parchment and place dough on a lightly floured surface.
• Cut out shapes with cookie cutters or a sharp knife.
• Arrange shapes on parchment lined baking sheets and refrigerate for another 30mins to an hour.
• Re-roll scraps and follow the above process until all scraps are used up.
• Preheat oven to 180°C (160°C Fan Assisted) / 350°F / Gas Mark 4.
• Bake until golden around the edges, about 8-15mins depending on the size of the cookies.
• Leave to cool on cooling racks.
• Once completely cooled, decorate as desired.


Royal Icing:
315g/ 11oz / 2½ cups Icing/Powdered Sugar, unsifted
2 Large Egg Whites
10ml / 2 tsp Lemon Juice
5ml / 1 tsp Almond Extract, optional
Directions
• Beat egg whites with lemon juice until combined.
• Sift the icing sugar to remove lumps and add it to the egg whites.
• Beat on low until combined and smooth.
• Use immediately or keep in an airtight container.


Decorating Your Cookies: Royal Icing
The most important thing when it comes to decorating with Royal Icing is the consistency.
There are two ways of flooding your cookies. Some like to do the outline with a thicker icing and then flood with a thinner icing. Some like to use the same icing to do both which saves time and you don’t have to have two different piping bags for each colour you’re using.
The Same Consistency Method
Consistency:
• Mix your royal icing according to the recipe/instructions
• Drag a knife through the surface of the Royal Icing and count to 10
• If the surface becomes smooth between 5 & 10 seconds, the icing is at the correct consistency
Tip: If your icing is too thick, thin it by adding a few drops of water. Mix, do the 10 second test, then if it’s still too thick, add a few more drops of water, repeat, etc.
Tip: To thicken your icing, add small amounts of icing sugar until thick enough for the 10 second test
Two Different Consistencies Method
Consistency:
• Mix your royal icing according to the recipe/instructions.
• Separate into 2 different bowls, one lot of icing for outlining, the other for flooding.
• For the outlining icing, drag a knife through the surface of the Royal Icing.
• If the surface becomes smooth at around 10 seconds, the icing is at the correct consistency.
Tip: If your icing is too thick, thin it by adding a few drops of water. Mix, count to 10 seconds, then if it’s still too thick, add a few more drops of water, repeat, etc.
Tip: To thicken your icing, add small amounts of icing sugar until thick enough for the 10 second test.
• For the flooding/filling icing, drag a knife through the surface of the Royal Icing.
• If the surface becomes smooth at around 3-4 seconds, the icing is at the correct consistency.
Tip: If your icing is too thick, thin it by adding a few drops of water. Mix, count to 3-4 seconds, then if it’s still too thick, add a few more drops of water, repeat, etc.
Tip: To thicken your icing, add small amounts of icing sugar until thick enough for the 3-4 second test.
Colouring• Separate Royal Icing into separate bowls for each colour you plan on using.
Tip: Make sure to cover the bowls with cling film or a damp cloth to prevent the top from setting and then making lumps
• Using a toothpick, add gel or paste colouring to each bowl and mix thoroughly until desired colour is reached
Tip: You can use liquid food colouring but you might not be able to get the desired strength of colour, liquid colouring will also thin out the icing so you’ll need to add more icing sugar to thicken it again.


Prepping and Filling Your Bag• Attach your icing tips to the piping bags using couplers
Tip: You don’t need to use a coupler but it makes it easier if you want to change tip sizes
Tip: A size 1 tip is best for doing intricate details. A size 2 tip is good for some details and outlining. Fill or flood with sizes 2 – 5.
Tip: You don’t need a piping bag, you can use a parchment cone or ziplock bag with a tiny bit snipped off the corner. I would however recommend getting a piping set if you don’t have one as it will be much easier and more precise.
• Stand the piping bags in glasses with the tops of the bags folded over the top of the glass.
• Fill your icing bags with each coloured icing.
• Tie the ends of the piping bags with elastic bands.
Decorating: Outlining• Fit the piping bag with a size 2 or 3 tip.
Tip: Or snip a very small bit of the corner off of a parchment cone or Ziploc bag
• Hold the piping bag at a 45 degree angle above the cookie where you want to start the outline.
• Gently squeeze the piping bag and start moving in the direction you want to outline the cookie.
• Start lifting the piping bag away from the cookie so that the flow of icing falls onto the cookie, making it an even and neater outline.
• As you start to reach the beginning of the outline, bring the piping tip closer to the surface of the cookie to meet the start of the icing outline.
Tip: If you’re doing an intricate cookie, like a snow flake, you won’t be able to lift the tip as far away from the cookie.
• If you’re doing a different colour border, eg a black border, let the outline dry before flooding. If using the same colour for the outline as you’re flooding with, begin flooding after doing the outline.
Decorating: Flooding
• Fit the piping bag with a size 2-5 tip, the bigger the area being filled, the bigger the tip.
Tip: Or cut slightly more off the corner of a Ziploc bag to create a slightly larger opening.
• Quickly zigzag back and forth over the area you want to fill.
Tip: You need to be quick when flooding the cookie so don’t worry too much if it’s not filled in neatly.
• Using a toothpick or clean paintbrush, push the icing around into the gaps that are still remaining.
• Either pick up the cookie and tip it from side to side to even out the filling, or lightly bang the cookie down on your kitchen counter.


Friday 17 September 2010

Rainbow Chard for a Summery Italian Pie


While the weather is nice (ish), I'm trying to make as many summery meals for us at home as I can before it seems dark outside and we revert back to eating stews, soups and other meals that warm the soul as well as the toes.

When the weather's fine, we eat one main dish, like frittata or homemade burgers with lots of salad and antipasti to make the meal go further. For pudding, we might induldge in a small cake or a little ice cream; but generally just slurp on ripe fruit and the occassional milkshake.


The trees are starting to shed their leaves in the park around the corner from us and a kind neighbour reminded us that this time next year, we will be busy making piles of them for M to jump in, over and over again. L wants to buy her some little green Hunter Wellington boots (to match ours) and the image I have in my head of this little picture is one that I am treasuring as if it has already happened. In the meantime, and until it becomes too cold and wet to do so, we take M to the playground round the corner as often as we can and she spends a lively half an hour smiling madly at the other children and trying to go head first on her tummy down the baby slide. The little dare devil. Needless to say, she never wants to leave and we see a few tears as we walk away from the bright red swings.

At this time of year, the stalls at the farmers market begin to reflect the change in seasons, and while the glassy redcurrants and crimson cherries are long gone; a few berries remain to tempt the palette, and varieties of apple, pear and quince remind me that there are still plenty of delicious orchard fruits to come.

Once a week, an email comes from Carey, strictly the restaurants organic supplier, but we reap the benefits too and order whatever they have in season. This time, L ordered a bag of rainbow chard and challenged me to do something with it other than steam it and serve the leaves with something other than olive oil and lemon.

Will this do?


Rainbow chard, artichoke and blue cheese filo pie

Ingredients
270g (approx. 12 sheets) filo pastry
25g melted butter
200g rainbow chard
3 large eggs
150g creme fraiche
400g can artichoke hearts
100g gorgonzola dolce

Method
Preheat the oven to gas mark 6/200C and line a baking tray with shallow sides with greaseproof paper.
Cook the rainbow chard for 3 minutes in salted water until just soft. Drain and set aside.
Carefully lay one sheet of filo pastry onto the lined baking tray so that the pastry forms a case and brush with some of the melted butter. Lay another sheet of filo on top and repeat the process until all the filo is used up.
In a medium bowl, beat together the eggs and creme fraiche with some salt and pepper.
Cover the pastry base with the chard and ripped up artichoke hearts. Do the same with the gorgonzola.
Pour over the egg mixture.
Place in the oven and cook for 20 minutes until the filling is set and the pastry is golden.


Monday 13 September 2010

A Pot of Tea, Some Clotted Cream and Plenty of Scones


This week I seem to have once again been in the wars.

To tell you of my little accidents briefly;
On Saturday night I was carelessly chopping onions and managed to stab the webbing between my thumb and forefinger.
On Sunday, my wisdom tooth decided to start coming through and has been quite sore all week.
On Tuesday, M was about to go looking through our fridge, as is her latest habit, and I bent down to pick her up and she opened the door right into my forehead.
On Thursday, I was holding M up to the window and letting her hit it in her excitment over seeing a white cat cross the street. Somehow, she managed to hit me right in the eye and her little nail scratched my retina. A trip to A & E confirmed a superficial wound to my retina and a course of antibiotics and instructions stating 'do not rub your eye' have followed.

I am sure I am not normally so clumsy.

Today, all I wanted was a little bit of comfort and a cup of tea to accompany it.


I associate certain foods with certain times of the year and certain moods. In the depths of winter, I used to come home from secondary school, often with my friend G, and we would sit down to watch a little TV and scoff some hot, bubbling cinnamon toast. In Spring we would enjoy Easter spiced biscuits and Simmel Cake, argueing the while who was to eat the last marzipan ball. All year round however, someone would come home wanting a hot treat for tea and whip up a batch of scones to enjoy with jam and occassionally, some clotted cream.


Ingredients
550g plain flours
4 tsps cream of tartar
2 tsps bicarbonate of soda
pinch salt
125g unsalted butter
300ml butter milk
1 egg, beaten in a small bowl

Method
Preheat the oven to gas mark 7/220C and lightly grease a baking tray.
Sift all of the dry ingredients into a bowl and rub in the butter until it resembles very fine breadcrumbs.
Add the buttermilk and bring together to a dough in the bowl.
Turn the dough out onto a lightly floured surface and roll out to 3cm thick.
Use a circular cutter to cut out as many scones as possible - do not twist the cutter to do so or they will not rise as well. I get 14 scones from this dough.
Arrange the scones on the baking tray and brush the tops with the beaten egg to glaze.
Cook for 10 minutes until tall and golden on top.
Eat while still warm from the oven with lashings of clotted cream and jam.
If, by some miracle, not all the scones vanish during one sitting, freeze the leftovers and to serve, defrost for an hour before popping them back in the oven to heat through again.

Sunday 12 September 2010

Parisian Treats

Can you guess what's in this box?


Yes, that's right, Les Macarons!

Last weekend when my mother took E to Paris to begin her life as an au pair, I sent her away with £10 and a list of streets on which she could find Laduree boutiques.

She came back with the most delightful stories of their three days in the capital and of a beautiful food market in Saint-Germain. My mouth was already practically dry from all the salavating over her tales, so you can imagine how I felt when she went to fetch her bag and withdrew a couple of gifts and this dainty little box.

It took me three very restrained days to finish them.


Pistachio, Raspberry, Dark Chocolate, Vanilla, Dulce de Leche, Violet-Cassis Macarons
Naturally, all of the flavours were incredible. The cassis came bursting out from within the macaroon as soon as I bit into it and was wonderfully intense.
My favourite, as boring as it seems, was the vanilla macaron. You can't really go wrong with vanilla in any type of dessert or pastry and this was no exception. I think I could also taste white chocolate in the ganache which made the macaron richer.

What's more, is all of this macaron tasting has inspired me to make some more macarons and try some more adventurous flavours. When I manage to make some, you'll be the first to know!

Wednesday 8 September 2010

Four Layered Farewell Panna Cotta


It is funny how one minute, you are a child, argueing over clothes in the dressing up box with your sisters; and then the next, you have all grown up and are capable of having a conversation that doesn't end up with raspberries being blown or someone saying 'bagsy'.

Although I realise that I probably 'grew up' the quickest out of all of us three girls (married at 22, a baby at 23), I still cannot believe that A is 18 and just making her way into the world of work and that E has a very respectable history degree and is off to a village South of Paris to become an au pair for a year.

It almost makes me sad to think of how fast we grew up and then how quickly M will grow up too.
So whie we enjoy the next stage in M's development - learning some more words and apparently also to quack (show the girl a duck and she 'bac, bac, bac's at you for a minute or two); E is just by Paris settling in with the new family and their two young daughters, learning to speak French!

Jealous much?

We havebeen trying to encourage her GCSE French out of her by making her watch French films, including La Haine and one of my favourites, Priceless. I love Audrey Tautou in anything she does. She almost persuaded me to go out and buy a bottle of Chanel No.5.........and then I remembered I don't actually like it.

We had a little family goodbye tea for E before she left with carrot cake and a selection of biscuits.
The night before however, E and her boyfriend T came over for a meal and a game of Scrabble.

We served homemade Moroccan spiced aubergine and chickpea burgers (a recipe that requires a bit of tweaking) and homemade chips.
T, for reasons I will never understand, despises cheese and is not a great dairy eater so serving a layered raspberry and blackberry panna cotta for pudding was a bit of a risk.


Seemingly though, it paid off and unfortunately, none of us was forced to finish his dessert for him. M had her own little portion in a little old jar and gobbled up her first taste of Italian dairy heaven.


Vanilla Panna Cotta with Raspberry and Blackberry Layers (adapted from Evan's Kitchen Ramblings) Makes 5 glasses

Ingredients
For the panna cotta
300ml double cream
150ml full fat milk
75g caster sugar
2 tsp vanilla extract with seeds
3 sheets leaf gelatine
For the raspberry jelly
100g raspberries
25g caster sugar
1 sheet leaf gelatine
For the blackberry and raspberry mousse
150g blackberries and raspberries
20g caster sugar
1 sheet gelatine
120g double cream
For the blackberry coulis
100g blackberries
20g caster sugar

Method
For the panna cotta
Fill a bowl with cold water and place the gelatine sheets in it to soften. About 4mins.
Heat the milk in a small saucepan until it just boils. Remove from the heat.
In another, larger bowl, place the cream, sugar and vanilla extract and bring just to the boil. Remove from the heat.
Once the gelatine is soft, remove from the water and squeeze out the excess. Put into the milk and stir to dissolve.
Pour the milk into the cream and stir well.
Pour carefully into the serving vessels and place in the fridge to set for about 3 hours or over night until firm.
For the raspberry jelly
To make the jelly, blitz the raspberries with the sugar and heat half of it over a low heat. Soak the gelatine sheet in cold water until soft.
Squeeze out the gelatine once again and stir into the warm fruit until dissolved. Add the rest of the puree and leave to cool to room temperature.
Once cooled, pour onto the top of the panna cotta to create the second layer and return to the fridge for around an hour until the jelly has set.
For the blackberry and raspberry mousse
Blitz the berries together with the sugar and warm half of the mixture in a small pan over a low heat. Soak the gelatine sheet in iced water. When soft, squeeze out the gelatine and stir into the fruit until dissolved. Add the rest of the fruit puree and leave to cool to room temperature.
Whisk the cream to soft peaks in a large bowl and using a rubber spatular, fold the fruit puree in until fully incorporated. Pour onto the top of the jelly layer and return to the fridge to set for another hour.
For the blackberry coulis
Blitz the blackberries and sugar together, then press through a strainer to filter out the seeds.
Spoon on to the top of the penultimate layer and use the back of a spoon to gently help it cover the top.


Incidentally, if you are at all interested, E is having a go at her own blog about her time in Paris. Do pop over and have a read here!

Sunday 5 September 2010

The Tale of the Neglected Crabapple Tree

There is a beautiful crabapple tree directly opposite our house that no one can claim as their own and no one ever uses. At the moment, it is covered in shades of burnt orange and red as the apples finally ripen.

In spring, blackbirds and bluetits amuse us hopping from branch to branch and all year round, the streets many cats, including our own fluff ball, Connie, scarper up it when startled or to get onto the wall opposite.
I will miss these sights when we leave our little terrace.

In the meantime, I find myself lusting after the bitter fruits and seeing as I have never seen anyone so much as look at the crabapples, last sunday, I decided to take action!

Tiptoeing out of the house in the morning after most of the neighbours cars have gone for the day, I collected all the bounty I could reach unaided and rush it back into the kitchen ready to be washed and prepared. M decided that she had to help try to eat up the cleaned fruit and every so often a little hand appeared by the fruit basket ready to pinch another fruit - prehaps in the vain hope that the next crabapple might be sweeter than the last.


I only gathered enough crabapples to use them two ways, but I have located our step ladder and will be back out to the tree (once again when the neighbours are out) to gather higher fruits. At the restaurant, I pickle pears to serve with the Italian meat plate and with the cheeses - pickled crabapples would be fun to serve for a bit. Watch this space.


Crabapple Schnapps

This is hardly a recipe, meerly a set of simple instructions. I have no idea what it tastes like yet, but after a week, the orange liqueur smells delicious and no longer like vodka.


Wash 20 crabapples and cut them in half. Don't worry about peeling or coreing them.
Place them in a clean, sterile jar or bottle with a tight fitting lid and cover with clear, unflavoured vodka.
Leave to steep for around 8 weeks in a cupboard, shaking lightly form time to time.
Strain and filter the infusion into a clean jar or bottle and store for a further month to age.
Serve as an appetizer or with a cheese plate.


The crabapple jelly below was my first foray into the world of jam making and was definitely a good recipe to break me in. Apple have pectin (jam setting agent) in naturally, so there were no complicating steps to the recipe and I can assure you that the smell around the house while the apples were straining through a muslin reminded me of Autumn in Hereford and the smell in the air of apples cooking at Bulmers Cider Factory.

Crabapple Jelly (from www.waitrose.com)


Makes 6 x 500ml jars

Ingredients
4kg crabapples
1 kg caster sugar
1 lemon

Method
Wash the apples, remove the blossom heads and cut out any bruised bits. Put in a saucepan, fill with water to cover the apples and bring to the boil. Simmer for 25 minutes until the fruit is soft. Pour the pulp into a jelly bag or several layers of muslin and let drip overnight into a pan beneath. Don’t squeeze the bag, it will cloud the jelly.
The next day, measure the juice, and combine with sugar at the ratio of 10 parts juice to 7 sugar. Add the lemon, then bring to the boil to dissolve the sugar. Keep at a rolling boil for 35–40 minutes, skimming off the froth regularly. To test, chill a dessertspoon in the fridge. When the jelly is set, it will solidify on the back of the spoon. Pour into warm, sterilised preserving jars and tightly seal while still slightly warm. Store in a cool dark place.


Friday 3 September 2010

Matcha Macaroons - Using Up Some of Those Egg Whites


50 egg whites later and here I am, standing next to a batch of Matcha Macaroons.

I didn't make 50 egg whites worth of macaroons. I don't have enough baking sheets. Most of the egg whites are now in the freezer, although I did make a failed attempt at some forgotten cookies. More on those another time.

During an impulse internet shopping spree two months ago, I decided to fork out for a pot of Matcha green tea powder from the Japanese Kitchen Shop.

The silver pot that arrived felt as if it contained nothing inside. However, peeling back the lid and cutting the foil open revealed the most delightful pistachio green powder I have ever seen. It is such a light and delicate dust that I became almost at once afraid of using it and put it straight into the cupboard, only to see it every time I opened it to get at other baking ingredients and feel a pang of guilt at not using it sooner.

Green tea compliments so many other flavours. I had some left over white chocolate Swiss Meringue Buttercream from A's Cake which I put into these. But they would work equally well, if not better, with a tropical fruit like passionfruit, or even something a little less exotic like a strawberry ganache.

Ingredients
125g ground almonds
225g icing sugar, sifted
2 tbsp Matcha green tea powder
100g egg whites
1/4 tsp cream of tartar
70g caster sugar


Method
Sift the icing sugar, almonds and green tea powder together onto a baking sheet.
Whisk the egg whites on a high speed until increased in volume and soft peaks form.
Add the sugar, one spoon at a time, mixing well after each addition until all the sugar is incorporated.
Add all the rest of the dry ingredients in six stages until all incorporated, mixing briefly at each stage so as not to over mix.
Line a baking sheet with baking paper and preheat the oven to gas mark 3/150C.
Fit a piping bag with a medium plain nozzole and fill with the mixture.
Pipe the mixture in circles not more than one inch across onto the baking sheet, leaving an inch between each one.
Leave for 20mins to set and develop a skin.
Bake for around 15mins until each macaroon has a foot and is barely golden on top.
Leave on the sheet for a minute or two before lifting off with a palette knife. Cool on a cooling rack.
Sandwich simliar sized macaroons together with buttercream or jam of your choice.